Showing posts with label DIY. Show all posts

virtually madeover >> front door

8.06.2014

My parents have a new house (retirement!!) in Arkansas, and I've been attempting to use my love for decor to come up with ideas for their new home.

I've often thought that virtual makeovers would eliminate lots of DIY mistakes, but how to do them is the kicker. Layla is awesome at this, but me? I know a few Photoshop tricks, but that's just about it.

Insert this tutorial!! I was able to view all of the videos for free and learned how to do a virtual room makeover! So, without further ado...


... a virtual front door makeover! 


Currently the door is a light aubergine/mauvish color. No offense to the previous owners, but YUCK.

Using my fancy new *skillz* I've madeover the door in several new colors - keeping in mind the client, wink, wink. This was the easiest one to do, and thus the first reveal.

(Oh, and the chartreuse is a joke.)


I'm liking the blue (top left) and the green (middle right) the best. What's your fav?

You'll be seeing more of this as a fun little series as I take the time to virtually makeover several rooms in their new home - mostly so they can get an idea of the things they like, don't like, etc. and so I can have a visual with some of my ideas. Ya know, because some ideas are better left in my head. ;-)

Cheers!

DIY rustic phone cabinet

8.01.2014

Kitchen update is complete!! (See previous posts here, here, here and here.)

My last project in the kitchen is complete. After several weeks of "in progress" because of my lack of a table saw, I finished my rustic phone cabinet.

This idea was the answer to a clutter problem.

Do you have a spot where stuff always seems to accumulate without a second thought? Ugh. Our microwave is a magnet for clutter and I hate looking at it. With our tiny kitchen layout, every time we need to move the dishwasher to hook it up to the sink, we have to move the phone off and on and off ...

So, I thought, why not build a small cupboard to house the phone, cover the ugly phone jack (see the pic below) and clear up some of the visible clutter?


I had a source for rustic 1x4s, so I figured they would work perfectly as the phone base is right around 4" wide. So when my Dad brought his miter saw to help with a couple of projects, I got several weathered boards, and we went to work.

Very quickly, I realized that said 1x4s were indeed NOT 1" or 4" wide. I should've known this, but wasn't thinking...

My dad did some math and said he would have to rip some boards length wise in order to make the depth of the cabinet wide enough to house the phone. But the table saw is at his house, so it would be a few weeks before I got to work on the cabinet again.


Once I obtained my newly cut pieces, I started putting them together.

I used all of the free items items I could:
3 - 1"x4" fence boards
2 old hinges and screws from this project
reused turquoise knob
1" finish nails and 1" wood screws that I had on hand


I purchased:
1 magnetic hinge kit
4-pack L-shaped brackets
2" screws and 1/2" screws (for attaching brackets)

= about $6-7

 Here is a view from the inside.

- I used the small pieces of wood (extra from the ripping job) to piece together the corners and then two of the longer extras to put the door slats together.
- The left set of L-brackets are screwed into studs and the other two are just screwed into the drywall for a little stabilization. I was going to put them in with plastic anchors, but ran into some sort of duct that made it impossible to screw anything into. (de ga je!)
- The door hinges and magnetic closure are pretty self explanatory. :-)

Aren't the weathered variations so pretty?


I know my dishwasher/microwave combo isn't much to look at, but the pic gives some perspective on the cabinet. Doesn't this little nook look so much cleaner?


I have to admit - even with this "fix" the microwave is still a magnet for stuff, but at least it's not home to those things anymore.

Woot for a finished room!

bedroom decor update

7.30.2014

So, I've done a little bedroom updating and haven't completed it -- but I decided to show you the "in progress" view anyway. Because, who knows how long it would take me to finish!? As always, feel free to offer any suggestions you have.

Here we are a few months ago ... my snowflake banner was still up, so it must've been wintry out. Our bedspread is looking a little faded (weird lighter spots - from the sun?) and when I painted the walls brown, all of a sudden it was like ...

EVERYTHING. DROWNING. IN. BROWN.

Not good.


My sweet friend visiting from California gave me a few moments of our precious time together to give me some suggestions on the room. We flipped the bedspread over and rearranged the pillows a bit.

Last week I scored a cream tailored bedskirt at a discount store, and reupholstered the headboard in dropcloth fabric.

The headboard definitely pops against the darker wall and I like that I can play a little bit more with the pillow colors - now I'm not limited to gold, tan, brown and blue.

I would love to eventually get a new bedspread and totally change up the colors, but this is what I chose (curtains + bedspread were wedding gifts) and I am determined to make the best of it for now.

Next on my list is making some hanging pendant lights to free up bedside stand space...


Maybe something industrial like these?

link


Or upcycling something vintage and turn it into a pendant light? I'll let you know when I come up with it. It may be a couple of years, but it will be done.

;-)

inspired shelves (yet unfinished)

6.04.2014

I've never really loved this living room shelf.


I loved the idea of it ... but it turned out pretty underwhelming considering the space.

So, when my FIL was in town for a few days during graduation this month, I twisted his arm and had him help me hang new shelves. I took the two brackets from the previous shelf and stole the other two from the girl's room and used Mandi's inspiration to hang these shelves.

The only thing I did differently was use regular screws for the studs and machine screws (plus hex nuts) for the shelves because the holes were a lot smaller in my brackets than the ones she used.


I've been trying to decide where to use this corbel from my in-laws 100+ year old farm house when it struck me -- looks like an "S"! Why not use it as a monogram? It adds some dramatic height that I love.

I'm going with a bit of a green theme to bring in some color as well as a little purple and yellow ... to bring out the fun colors in my vintage curtains. Love this little ceramic bird from the hobby store, compliments of my sis and bro-in-law. (Gotta love gift cards!)

So, here's my dilemma. I love asymmetry, but I think that the shelves need some balance. All along, I have been planning to put something in the space below, but I can't decide what. 

Any ideas? Here are a few things I've considered.

String art.

source
Vintage arrow or arrow marqee (except they are $$$!)

source

Or a DIY reclaimed wood arrow?

source

Or a framed photo? Or...? Any other ideas I'm missing? I need your help filling this space!

Last question: if you look back at the photo of the shelves, is there too much "fluff" going on? (i.e. the feathers on the left, the faux branches on the right, and the spikey plant on the bottom?) Should I use a different texture? If so, what?

new kitchen color

5.28.2014

I had a problem in my kitchen. (I have many other kitchen problems, just ask my husband about the chickens.) This one didn't have to do with food, though. After about 5 years of yellow in my kitchen, the walls had seen better days. Chair scrapes, paint peeling, stains ... you get the picture.

Brilliant idea #1 
"I'll go get the same paint at the hardware store."

Um, no. After 5 years, the paint colors change.


Brilliant idea #2
"Color match!"

No chipping pieces I could conveniently pull to color match.


Brilliant (and final) idea #3
"Repaint!!"


So, I did, with a gallon of free paint from the county paint drop-off (you can get rid of old paint there or get some "new" for free!). And I love the new look!

DIY antiqued antique mirror

4.09.2014

So last summer I was scouring my in-laws old farm house (yet again!) after they'd cleaned out their attic. In amongst the treasures was a small old window. It just looked like a small window because you could see right through the glass, but on closer inspection, I realized that it was a mirror! Almost all of the silvering had come off (sniff!). The wood finish was cracking from changes in temperature and age and was so rustic and pretty looking.

When I went to wash off the grime with just a little water, the silvering completely cleaned off to show the quality beveled glass. And the wooden frame? You would have to break wood off the back to get the glass out, so I wanted the glass to stay.

But I wanted it to be a mirror. Hmm.

I looked into re-silvering but had a terrible time finding someone to do it. The man I talked to literally said that everyone that used to do it was dead. The reason no one does it anymore is because the chemicals used to take the old silvering off were banned because of how crazy dangerous they are! However, since my mirror was already de-silvered, I just needed the mirror coating put back on.

No luck.

I did talk to a guy who wanted about $200 for an un-perfected silvering method he was working on. I said, "Uh, no thanks."

Then I ran into an online tutorial (the link is for a more recent version) for a similar, albeit faux, look with Looking Glass spray paint from the hobby store.

$7 with coupon? Yes, please!

I broke it out last weekend to *finally* work on this long-time-coming DIY and here is the result.

I didn't re-read the tutorial before I got into it, and I wish I would've. I followed the instructions on the can to use 5 thin coats instead of the one thick coat Jenny recommends. I think the bright sunshine plus the extra time sealed in some of the smaller droplets I would've liked to rubbed off. Oh well.

It was also difficult to see exactly where all of the water/vinegar drops landed and I think I would've made some of them a little less uniform for a more authentic look.

I topped it off with a few coats of black spray paint (so instead of seeing through the spots where the looking glass spray was wiped away, it would look black like an antique mirror) and added two small eye hooks and a picture hanging wire. 

Overall I'm pleased! My "new" mirror has found a home on the wall near our bed. I'm working on a several more changes before I reveal the whole bedroom look (if I can call it that, ha!). So stay tuned!

:-)

once an ottoman, twice DIYed

3.26.2014

Over three years ago, I redid our sadly chewed up Target storage ottoman with a slip cover. It was literally the only piece of furniture we bought after we got married. (sniff) Of course, the puppy chewed that one.


After using it daily, the cover needed a wash, so I did. But I'd forgotten that I didn't preshrink the fabric the first time around, so ... it shrunk. Ugh.

Oh well, we kept using it.

And then it got really, really dirty (think toddler, dog, husband, me...) and began to come apart in places and it was time for a change.

(problem) Not to mention, I was struggling with solutions for toy storage space ...  I had thought about an open coffee table with rolling crates underneath, a different coffee table and storage crates beside the couch, a vintage trunk, etc.

A couple of friends nixed the vintage trunk route because the lids are often very heavy and suggested a storage ottoman. Yes, well, I have a storage ottoman but it is being used to house photos and a few wedding memorabilia. And the slip cover is a pain and a half to get off/get on every time my toddler wants to get in it. It just wouldn't be good for toys.

*******

(solutions) A couple of weeks later, I thought, "Why not use it and just change it up? Isn't that what I've been talking about on my blog?!" So I scanned all of the old photos except for one album from my travels in Europe from 2006 and our wedding album. 360+ photos are gone from my life but still accessible on the computer. Decluttering is beautiful.

I made room in my linen closet for the wedding box.

And then I decided to rip the upholstery off the ottoman and slap some wood slats on the outside for a completely different look. Storage for toys that looks a lot better than it did. Away with thee, slipcover!!


Ladybug and I went to visit my parents over spring break, so I decided to shove the torn-apart ottoman in the back of the car and ask my dad to help me fix it up.

My idea: slap some wood on the outside, maybe sand and stain.

My Dad's idea: un-upholster the entire thing, take it completely apart, cut it down so the lid would fit with an extra 3/4" of wood added to the outside, put the box back together and then painstakingly fit each piece of wood to the outside.

Of course, we did it the right way.

Here goes!


First, we took all of the upholstery off (including all 1,000 staples) and took the entire box apart to hopefully reuse. Then we cut about 1-1/2" off each piece and used an electric nail gun to put it back together (yay!). We put the inside upholstery back in as we went.

Each board was cut at a 45 degree angle (LOTS of 45 degree angles, compound angles, too) to create an interesting pattern and then we glued and fitted pieces of free oak flooring - leftover from a kitchen flooring project - to cover the entire ottoman. This about tripled its weight. In a good way. 

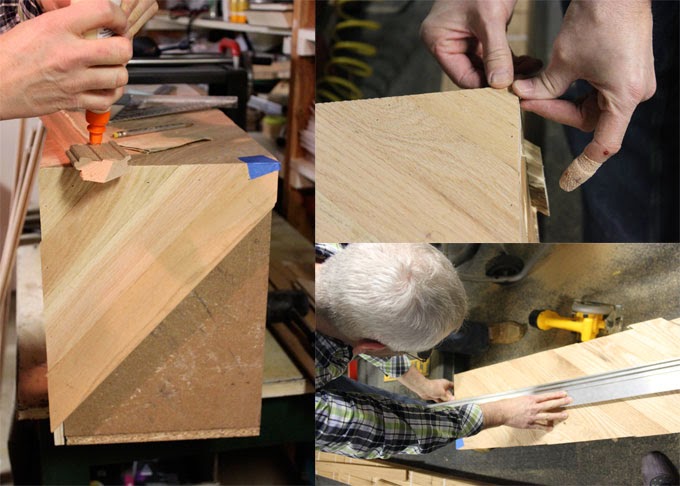
After piecing it all together, it the edges weren't totally even, so we took the circular saw and evened out the top and bottom edges. While cutting the pieces, we were reminded to not cut pieces of wood that are too small. Right, Dad?


And here it is!! After I took it home, I sanded it, stained it with Dark Walnut and sealed it with three coats of polycrylic.

I had to make-do with the upholstery, so I covered up the lip with brown scraps and re-stapled the inside upholstery up. Final step was to screw 
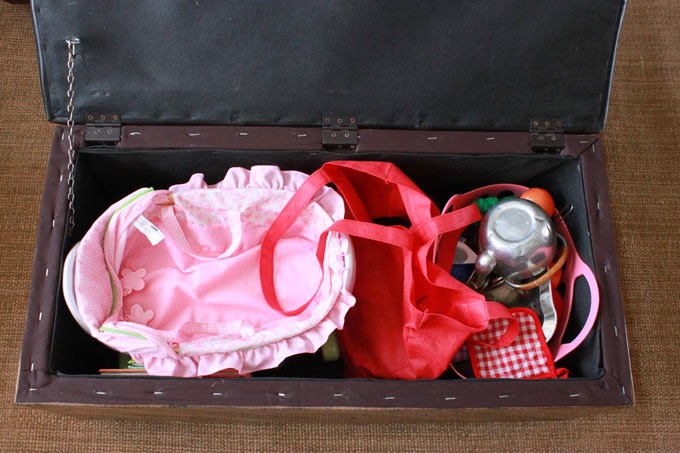
the legs back in and install a length of chain since the lid mechanism didn't work with the new, smaller box size. I don't love seeing the staples, but it really isn't a big deal as the lid is closed most of the time.

And the toys are officially hidden from sight!

Finally, a satisfactory solution to my toy dilemma. It's a more masculine look than I usually go for, but I really like it. And it's still very comfy to prop up on and type a blog post (wink).


 With a 5x7 clearance jute rug from Target, I think it looks smashing!

Third time's a charm?

I sure hope so.

easy DIY skeleton key art

2.19.2014

I have a little DIY art project to share today with skeleton keys.

I've been sort of drooling over skeleton keys and my in-laws picked some up for me at a flea market/antique store last fall. I saw this idea on Pinterest and decided to try it out.

I'd had some framed square pictures with dried flowers and a Bible verse in it - they were a wedding gift and something that was nice, but just not my style to begin with, but I'd hung them on the kitchen wall because I could (note to self: not a very good reason). I was considering buying some frames for my skeleton key art when I remembered these lonely frames!


The art was easily removed and I popped the glass out. I trimmed a small piece of white burlap to fit the square, and then I just refitted the glass and a piece of cardboard to the back - that way if I want to redo these frames again (or donate/sell them), the exact glass is there, but doesn't bother me a bit in the meantime. I flipped them over and hot glued the keys straight to it. That's it!


 I rehung them next to my DIY kitchen pegboard and their value has increased 100 times to me - even though it didn't cost me anything at all. (And I actually like them now, ha!)

 Don't you love the keys' character?

*free* necklace hanger DIY

2.12.2014

I've been working on decluttering again (I feel like I was just doing a big sweep, but the need comes around so quickly!) ... this time, visually. My craft/vanity side of the bedroom is probably the most cluttered area of my house and it has gotten to the point of driving me crazy. Here's a good peek at how it's been for quite awhile. My scarves were getting out of control.


Here's a little snippet of my progress! A DIY necklace hanger made from a leftover piece of pine 1x2 and some picture hangers.


Inspiration came from this post over at Little Green Notebook. (Have you checked out her blog? It's amazing. She's totally a professional interior designer, and has some incredible stuff going on, but she's also down-to-earth with some pretty doable DIYs. Check. her. out.) I even went right out and bought those little mug hangers.

And then I remembered a TON of picture hangers I had from a freebie my mom scored at her local hardware store. Those hangers, along with a free sample of Valspar and a leftover 1x2 ... a free necklace hanger for me!

Mint and gold anyone?!


 I first tried laying them out at about 1/2" apart and then realized that it was too squished. So I marked little dots at 3/4" apart with a measuring tape and started pounding them in.

As you can see, they aren't perfect. At first, I thought it was my less-than-perfect hammer wielding skills combined with the odd nail angle of picture hangers, but then I compared several and realized they aren't even uniformly made. So, I tossed perfection out the door and just did the best I could. I had to use a few bigger ones to fill the space, so each of my pretties would have a hook, and I'm so pleased!

Can it get any better than less clutter and free?! I think not! :-)